
Sometimes, texting your thoughts and emotions can get tiresome or impersonal. To avoid this, you can use the built-in Audio option in the Messages app to send voice messages from your iPhone. Here’s everything you need to know.
How to send a voice message on iPhone in iOS 17
There are a few things you need to take into account before sending voice messages on iPhone.
First, you need to ensure iMessage is active for both the sender and receiver. Otherwise, the audio recording will be sent as an MMS.
Next, if you are using iOS 16, the Audio option (blue waveform icon) is available right under the text field in the Messages app. You can just tap on it and record your voice message.
Now, if you are using iOS 17, you need to tap the + button next to the text field to select the Audio option and send voice messages. Here’s a step-by-step guide:
How to record and send an audio message on iPhone
- Open the Messages app → Head to an iMessage conversation or start a new one.
- Tap the + button to the left of the text field.
- Select Audio from the pop-up to begin recording your voice message.

- Tap the red Stop button to pause or end the recording. Then, tap the Play button to review it.
- You can also tap the “+ (with the message duration)” button to continue the recording.
- If you are satisfied with the recorded message, tap the Send button (blue arrow). If not, tap the X button to discard it.

If you send a voice note accidentally, don’t worry. You can unsend it, just like how you can unsend text messages on your iPhone. Just press and hold the voice message and select Undo Send from the pop-up.
Alternatively, you can ask Siri on your iPhone to send a voice message to a particular contact.
Further, by default, every voice message you send or receive expires within 2 minutes of sending or listening to it.
So, if you want to keep the voice message in the iMessage conversation, you need to tap Keep under the voice message or head to Messages settings and change the expiration settings.
How to listen and reply to voice messages on iPhone
There are a couple of ways you can listen or reply to voice messages. Additionally, you can save the voice messages you receive to the Voice Memos app. I’ll walk you through each process one by one.
Listen to voice messages
- Tap the Play button on the voice message you received.
- Alternatively, you can raise the iPhone to your ear, and the message will start playing automatically.
If Raise to Listen isn’t working for you, make sure the feature is enabled in Settings → Messages.
Reply to a voice message
You can obviously respond to a voice message with text as usual. But if you wish to respond with an audio message of your own, here’s how you can do it:
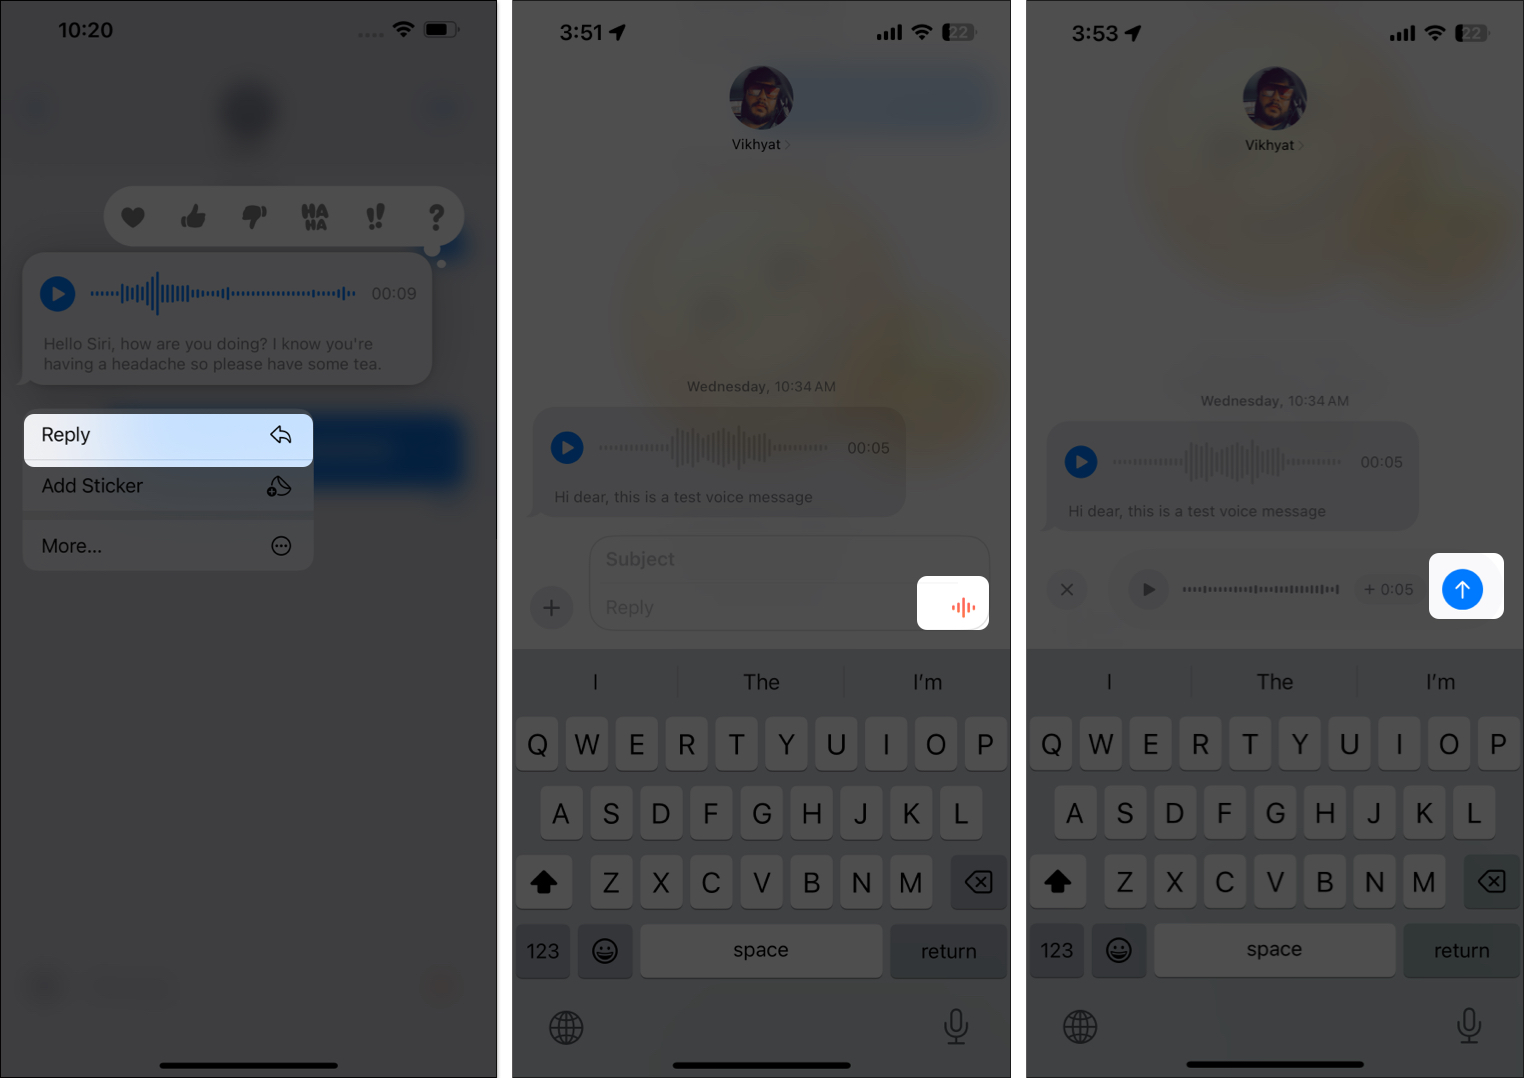
- Press and hold the voice message you received → Pick Reply from the pop-up.
- Tap and hold the red wave icon in the text field to record your reply.
You can directly come to this step if you don’t wish to point out which particular message you’re replying to. - Once you’re done speaking, tap the red Pause button to stop recording.
- Finally, to send the recording, tap the Send button at the right of the text field.
Alternatively, if you want to respond without tapping your iPhone display, you can lower your iPhone and raise it back to your ear → Once you hear a tone, you can start recording your response. Please note that this method works only for the last audio message you received in an iMessage thread.
Save voice messages
You can easily save a sent or received audio message to the Voice Memos app.
- To save a voice message to the Voice Memos app, you must first select the Keep option underneath it.
- After that, long press the audio message → Select Save to Voice Memos from the pop-up that appears.

To find the recording in the Voice Memos app, go to All Recordings → Look for a clip titled Audio Message from <contact name>.
I’d highly recommend renaming the title of the audio clip to something you can recall later because there’s no way you can search for an audio message in the Messages app.
To rename, tap the audio file → Select the three-dot menu → Edit Recording → Tap the title and edit it.
Limitations of sending voice messages on iPhone
While voice messages allow you to express yourself more accurately, they certainly come with a few drawbacks:
- Privacy concerns: If you are in a public place or a meeting, sending an audio message can get awkward – especially if you are passing on confidential or private information.
- Accessibility: People with hearing impairment may find it hard to access voice messages. Also, sometimes, listening to an audio message isn’t feasible if the user is in a noisy environment.
- Search issues: Unlike text messages, searching for a particular voice message in a thread using Search is impossible.
- Transcription issues: You may not always get an accurate transcription, due to different accents, background noise, and so on.
- Stable internet connection: While you can send a text message even when your iPhone’s internet speed is slower, voice messages require a stable internet connection.
- Compatible issues with non-iOS devices: While you can anytime use a third-party messaging app to send audio messages to a non-iOS device, the same is not possible with iMessage.
Yes, you can send audio messages from an iPhone to Android via the Voice Memos app. To do so, open the Voice Memos app > record and save a Voice Memo > tap the three-dot icon on the recorded message > tap Share and select the Messages app > Add contact and tap Send.
Go to Settings on your iPhone > Messages and tap on Expire under the Audio Messages section. Next, select Never in the subsequent menu.
Conclusion
There you go; this is how you send voice messages on iPhone. By now, you must agree on how convenient recording and sending a voice message can be, when compared to typing those long texts. However, just to be sure of what you’re doing, always review a recorded message before sending.
If you have any doubts or questions regarding voice messages, feel free to comment below. I’d be happy to respond.
Read more:
- How to turn off read receipts in iMessage on iPhone and Mac
- How to send a text message instead of iMessage on iPhone
- How to send iMessage with effects on iPhone and iPad
🗣️ Our site is supported by our readers like you. When you purchase through our links, we earn a small commission. Read Disclaimer.